Pure EJB3 Tutorial
Sculptor provides an EJB3 target implementation without any Spring dependencies (project nature pure-ejb3). This tutorial describes how to setup projects, explore it with JUnit tests and finally deploy and try it in JBoss.
Table of Contents:
Part 1 - Setup Projects
In this first part we will setup the project structure for Maven and Eclipse. It consists of the following Maven projects:
helloworld-parent- Only a maven project for building the other parts.helloworld- Business tier. EJB project containing the services and domain objects.helloworld-ear- EAR package of the deployable application.
These projects are created with Sculptors Maven archetypes as follows:
-
Create
helloworld-parentproject with the following command (one line - indicated by the trailing\):mvn archetype:generate -DinteractiveMode=false -DarchetypeGroupId=org.sculptorgenerator \ -DarchetypeArtifactId=sculptor-maven-archetype-parent -DarchetypeVersion=3.1.0 \ -DgroupId=org.helloworld -DartifactId=helloworld-parent -Dpackage=org.helloworld \ -Dversion=1.0-SNAPSHOT -Dejb=true -Dear=trueThe property
-Dejb=trueindicates that an EJB3 target implementation (project naturepure-ejb3) should be generated. If this property is omitted or set totruethen a Spring target implementation is generated instead. The property-Dear=trueindicates that the EAR modulehelloworld-earshould be imported in the Maven POM. -
Create
helloworldproject with the following command:mvn archetype:generate -DinteractiveMode=false -DarchetypeGroupId=org.sculptorgenerator \ -DarchetypeArtifactId=sculptor-maven-archetype -DarchetypeVersion=3.1.0 \ -DgroupId=org.helloworld -DartifactId=helloworld -Dpackage=org.helloworld \ -Dversion=1.0-SNAPSHOT -Dejb=true -Dear=trueThe property
-Dejb=trueindicates that an EJB3 target implementation (project naturepure-ejb3) should be generated. If this property is omitted or set totruethen a Spring target implementation is generated instead. -
Create
helloworld-earproject with the following command:mvn archetype:generate -DinteractiveMode=false -DarchetypeGroupId=org.sculptorgenerator \ -DarchetypeArtifactId=sculptor-maven-archetype-ear -DarchetypeVersion=3.1.0 \ -DgroupId=org.helloworld -DartifactId=helloworld-ear -Dpackage=org.helloworld \ -Dversion=1.0-SNAPSHOT -Dejb=true -
Change directory to
helloworld-parent. Runmvn install. -
Open Eclipse and import the projects via (via Eclipse M2E) with “File > Import… > Existing Maven Projects”.
Part 2 - Generate Code
In this part we will write a Sculptor DSL file in the project helloworld and generate code from it. We will explore it with JUnit testing using OpenEJB.
Ordinary CRUD Service
Let us start with an Entity with CRUD operations.
-
Modify the file named
model.btdesignin foldersrc/main/resources/. Use the following:Application Universe { basePackage=org.helloworld Module planet { Entity Planet { scaffold String name key; String message; } } } -
Run
mvn clean installto generate code and build. The JUnit test will fail.After executing a Maven build from the commandline the corresponding projects in Eclipse have to be refreshed manually! Thereafter you should not have any red crosses (problems) in Eclipse. Sometimes, validation errors in code generation files (.xtend) must be cleaned manually as well. This an be done with a “clean build” (using “Project > Clean…”) of the corresponding Eclipse project.
-
Now it is your job to complete the failing JUnit tests in
PlanetServiceTest.@Test public void testFindById() throws Exception { Planet earth = planetService.findById(getServiceContext(), 1L); assertNotNull(earth); assertEquals("Earth", earth.getName()); } @Test public void testFindAll() throws Exception { List<Planet> planets = planetService.findAll(getServiceContext()); assertEquals(2, planets.size()); } @Test public void testSave() throws Exception { int planetsBefore = countRowsInTable(Planet.class); Planet jupiter = new Planet("Jupiter"); jupiter.setMessage("Hello from Jupiter"); planetService.save(getServiceContext(), jupiter); int planetsAfter = countRowsInTable(Planet.class); assertEquals(planetsBefore + 1, planetsAfter); } @Test public void testDelete() throws Exception { int planetsBefore = countRowsInTable(Planet.class); Planet earth = planetService.findById(getServiceContext(), 1L); planetService.delete(getServiceContext(), earth); int planetsAfter = countRowsInTable(Planet.class); assertEquals(planetsBefore - 1, planetsAfter); }HSQLDB is used as in-memory database when running JUnit. Add the following test data in
src/test/resources/dbunit/PlanetServiceTest.xml:<?xml version="1.0" encoding="UTF-8"?> <dataset> <PLANET id="1" name="Earth" message="Hello from Earth" LASTUPDATED="2006-12-08" LASTUPDATEDBY="dbunit" version="1" /> <PLANET id="2" name="Mars" message="Hello from Mars" LASTUPDATED="2006-12-08" LASTUPDATEDBY="dbunit" version="1" /> </dataset>When running the test the application is deployed in the embedded OpenEJB container. All that is taken care of by the
AbstractOpenEJBDbUnitTestbase class.
Messaging
Let us add a Message Driven Bean (MDB) into the mix.
-
Add the following consumer to the same module as the
Planetentity inmodel.btdesign:Consumer PlanetConsumer { queueName=queue/addPlanet } -
Generate by running
mvn generate-sources -
This time I provide the JUnit test and your job is to develop the solution. Change the
PlanetConsumerTestso that it looks like this:@Test public void testConsume() throws Exception { int countBefore = countRowsInTable(Planet.class); String message = "Jupiter"; Destination replyTo = sendMessage(queue, message); waitForReply(replyTo); int countAfter = countRowsInTable(Planet.class); assertEquals(countBefore + 1, countAfter); } -
As I said, it is up to you to make this test green. The starting point of your coding is in
PlanetConsumerBean. You need thePlanetRepository, which is injected in this way inmodel.btdesign:Entity Planet { scaffold String name key; String message; Repository PlanetRepository { } } Consumer PlanetConsumer { inject @PlanetRepository queueName=queue/addPlanet }
Remote and Local Interfaces
By default both local and remote interfaces are generated for each Service. You can adjust that with the hints notRemote and notLocal.
Service PlanetFacade {
    hint="notLocal"
    sayHello => InternalPlanetService.sayHello;
}

Service InternalPlanetService {
    hint="notRemote"
    String sayHello;
}
Web Service
The third ingredient in this tutorial will be a web service, which we later will try in JBoss.
-
Define the web service in
model.btdesign:Service PlanetWebService { webservice List<@PlanetDto> getAllPlanets; } DataTransferObject PlanetDto { String name required; }Note that when working with web services we must use Data Transfer Objects (DTOs) as parameters and return types.
Attributes in DTOs are by default optional, i.e. elements will be skipped if the value is
null. It is possible to definerequiredas done above to indicateminOccurs="1"in WSDL. It is also possible to usenullable, which means thatxs:nilis sent when the value of the attribute isnull. -
Please complete the failing test
PlanetWebServiceTest. You will need to add some code inPlanetWebServiceBeanand the corresponding DBUnit test data. Once again you will need to inject the repository (injectkeyword must be placed afterwebservicekeyword).
Part 3 - Deploy in JBoss
Well done! Let us try it for real in JBoss.
Start JBoss
-
Download JBoss AS 7.2 from here or here and unpack the archive.
-
From within
JBOSS_HOMEstart JBoss in “standalone” mode with the full profile, e.g../bin/standalone.sh -c standalone-full.xml.We need the “full” profile because we need a messaging subsystem for our
PlanetConsumerMDB. The “default” profile of JBoss AS 7 doesn’t come wih it’s HornetQ-based messaging subsystem. HornetQ is part of the “full” profile only. -
Test your JBoss AS installation by pointing your browser to http://localhost:8080 which brings you to the Welcome Screen
Configure JBoss
Before we can deploy our EAR we have to prepare some resources within JBoss first:
-
JBoss AS 7 doesn’t come with HSQLDB anymore (instead JBoss uses H2 as in-memory database). So we have to install the HSQLDB JDBC driver first. For this we’re using the JBoss Command Line Client (CLI) as described here. Locate the latest version of the HSQLDB JDBC driver JAR in you local Maven repository and fire up JBoss CLI:
./bin/jboss-cli.sh
You are disconnected at the moment. Type 'connect' to connect to the server or 'help' for the list of supported commands.
[disconnected /] connect
[standalone@localhost:9999 /] module add --name=org.hsqldb --resources=/Users/torsten/Develop/maven-repos/org/hsqldb/hsqldb/2.2.9/hsqldb-2.2.9.jar --dependencies=javax.api,javax.transaction.api
[standalone@localhost:9999 /] /subsystem=datasources/jdbc-driver=hsqldb:add(driver-module-name=org.hsqldb, driver-name=hsqldb, driver-class-name=org.hsqldb.jdbc.JDBCDriver)
{"outcome" => "success"}
In the above
module addcommand you have to update theresourcesparameter with the full path to your local Maven repository! -
Next we need the datasource
UniverseDSwhich is using HSQLDB. A deployable datasource configuration can be found insrc/generated/resources/dbschema/universe-ds.xml. But we’re using JBoss CLI for this as well:[standalone@localhost:9999 /] /subsystem=datasources/data-source=UniverseDS/:add(driver-name="hsqldb", connection-url="jdbc:hsqldb:mem:universe", jndi-name="java:/jdbc/UniverseDS", use-java-context=true, user-name="sa", password="sa") {"outcome" => "success"} [standalone@localhost:9999 /] /subsystem=datasources/data-source=UniverseDS/:enable(persistent=true) {"outcome" => "success"} -
Then we need the message queue
queue/addPlanetfor ourPlanetConsumerMDB. Here we’re using JBoss CLI as well:[standalone@localhost:9999 /] /subsystem=messaging/hornetq-server=default/jms-queue=addPlanetQueue/:add(entries=["java:/queue/addPlanet", "java:jboss/exported/queue/addPlanet"]) {"outcome" => "success"} -
Our
PlanetConsumerMDB inherits from Sculptors framework classAbstractMessageBean. This class needs (for invalid message handling) a reference to JBoss internal ConnectionFactory namedjms/QueueFactoryand a separate message queue calledjms/invalidMessageQueue. Here we’re using JBoss CLI as well:[standalone@localhost:9999 /] /subsystem=messaging/hornetq-server=default/connection-factory=InVmQueueFactory/:add(entries=["java:/jms/QueueFactory"],connector={"in-vm" => undefined}) {"outcome" => "success"} [standalone@localhost:9999 /] /subsystem=messaging/hornetq-server=default/jms-queue=invalidMessageQueue/:add(entries=["java:/jms/invalidMessageQueue"]) {"outcome" => "success"} -
Check the JBoss console log. Here you should find the results of our JBoss CLI usage, e.g.
10:26:21,647 INFO [org.jboss.as] (Controller Boot Thread) JBAS015874: JBoss AS 7.2.0.Final "Janus" started in 2799ms - Started 151 of 210 services (58 services are passive or on-demand) 10:27:15,862 INFO [org.jboss.as.connector.subsystems.datasources] (management-handler-thread - 4) JBAS010403: Deploying JDBC-compliant driver class org.hsqldb.jdbc.JDBCDriver (version 2.2) 10:35:48,490 INFO [org.jboss.as.connector.subsystems.datasources] (MSC service thread 1-11) JBAS010400: Bound data source [java:/jdbc/UniverseDS] 10:40:46,624 INFO [org.hornetq.core.server] (ServerService Thread Pool -- 60) HQ221005: trying to deploy queue jms.queue.addPlanetQueue 10:40:46,675 INFO [org.jboss.as.messaging] (ServerService Thread Pool -- 60) JBAS011601: Bound messaging object to jndi name java:jboss/exported/queue/addPlanet 10:40:46,676 INFO [org.jboss.as.messaging] (ServerService Thread Pool -- 60) JBAS011601: Bound messaging object to jndi name java:/queue/addPlanet 10:48:48,487 INFO [org.jboss.as.messaging] (ServerService Thread Pool -- 61) JBAS011601: Bound messaging object to jndi name java:/jms/QueueFactory 10:49:05,649 INFO [org.hornetq.core.server] (ServerService Thread Pool -- 61) HQ221005: trying to deploy queue jms.queue.invalidMessageQueue 10:49:05,650 INFO [org.jboss.as.messaging] (ServerService Thread Pool -- 61) JBAS011601: Bound messaging object to jndi name java:/jms/invalidMessageQueue -
To access our
PlanetConsumerMDBs message queuequeue/addPlanetremotely we have to define in JBoss security realm an application user with nametestuser, passwordtestuser$1and roleguest. For this we’re using the JBoss add-user utility:./bin/add-user.sh What type of user do you wish to add? a) Management User (mgmt-users.properties) b) Application User (application-users.properties) (a): b Enter the details of the new user to add. Realm (ApplicationRealm) : Username : testuser Password : testuser$1 Re-enter Password : testuser$1 What roles do you want this user to belong to? (Please enter a comma separated list, or leave blank for none)[ ]: guest About to add user 'testuser' for realm 'ApplicationRealm' Is this correct yes/no? yes Added user 'testuser' to file '/Users/torsten/Develop/jboss-as-7.2.0.Final/standalone/configuration/application-users.properties' Added user 'testuser' to file '/Users/torsten/Develop/jboss-as-7.2.0.Final/domain/configuration/application-users.properties' Added user 'testuser' with roles guest to file '/Users/torsten/Develop/jboss-as-7.2.0.Final/standalone/configuration/application-roles.properties' Added user 'testuser' with roles guest to file '/Users/torsten/Develop/jboss-as-7.2.0.Final/domain/configuration/application-roles.properties' Is this new user going to be used for one AS process to connect to another AS process? e.g. for a slave host controller connecting to the master or for a Remoting connection for server to server EJB calls. yes/no? no
Deploy EAR
Well done. Now we can deploy our EAR to the configured JBoss. For this we’re using the JBoss AS Maven plugin. From within the EAR project helloworld-ear execute mvn jboss-as:deploy.
If the deployment is successful then the JBoss console logs shows something like this:
11:07:59,586 INFO  [stdout] (ServerService Thread Pool -- 73) Hibernate: create table PLANET (ID bigint not null, CREATEDBY varchar(50), CREATEDDATE timestamp, LASTUPDATED timestamp, LASTUPDATEDBY varchar(50), MESSAGE varchar(100) not null, NAME varchar(100) not null, VERSION bigint not null, primary key (ID))
11:07:59,587 INFO  [stdout] (ServerService Thread Pool -- 73) Hibernate: alter table PLANET add constraint NAME_ unique (NAME)
11:07:59,588 INFO  [stdout] (ServerService Thread Pool -- 73) Hibernate: create sequence hibernate_sequence start with 1 increment by 1
11:07:59,588 INFO  [org.hibernate.tool.hbm2ddl.SchemaExport] (ServerService Thread Pool -- 73) HHH000230: Schema export complete
11:07:59,592 INFO  [org.jboss.web] (ServerService Thread Pool -- 76) JBAS018210: Register web context: /helloworld
11:07:59,609 INFO  [org.jboss.as.server] (management-handler-thread - 32) JBAS018559: Deployed "helloworld-ear-1.0-SNAPSHOT.ear" (runtime-name : "helloworld-ear-1.0-SNAPSHOT.ear")
To check if our web service PlanetWebService is deployed successfully point your browser to http://localhost:8080/helloworld/PlanetWebService/WebDelegateEndPoint?wsdl which brings up the web services WSDL file.
Part 4 - Test It
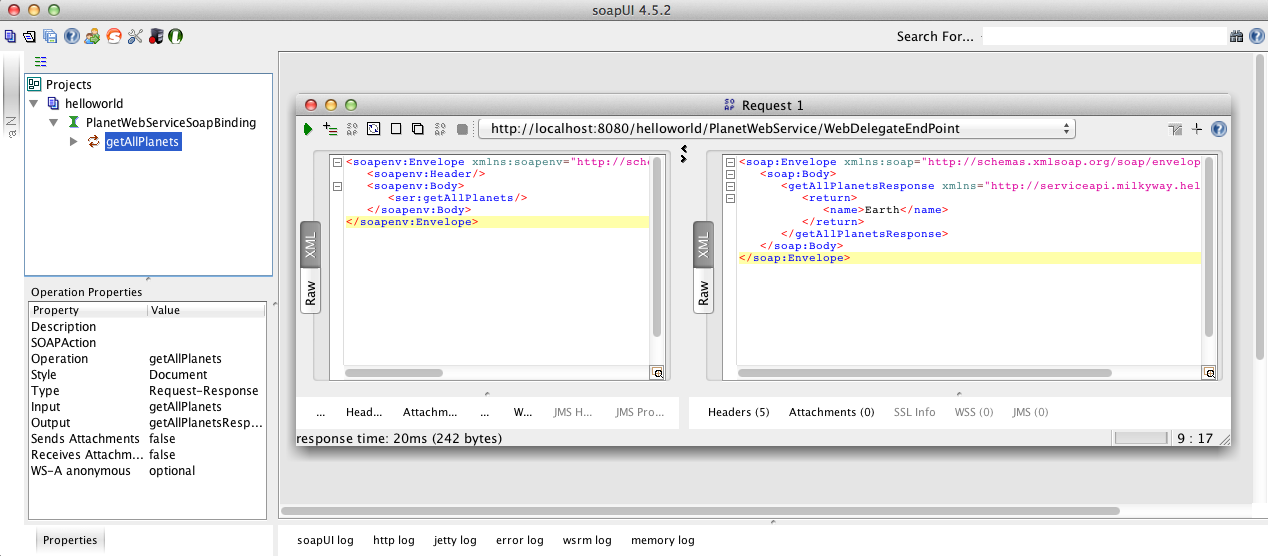
To try the web service you can use the free SoapUI tool.
The initial WSDL url is: http://localhost:8080/helloworld/PlanetWebService/WebDelegateEndPoint?wsdl
When you run the getAllPlanets request then the response is empty. Yes, the database is empty.
Let us send in a message to store a new planet.
To send a message to JBoss you can use a main class like this:
/**
 * Simple main class to send a message to JBoss @ localhost.
 * To be able to run this class you have to add the following jar before other jars
 * in the classpath:
 * <ul>
 * <li>JBOSS_HOME/bin/client/jboss-client.jar</li>
 * </ul>
 */
public class SimpleSend {

	private static final String USERNAME = "testuser";
	private static final String PASSWORD = "testuser$1";

	public static void main(String[] args) {

        String message = "Earth";
        if (args.length > 0) {
            message = args[0];
        }
        String queueName = "queue/addPlanet";

        Connection queueConnection = null;

        try {

            // InitialContext for jboss
            Properties properties = new Properties();
            properties.put(Context.INITIAL_CONTEXT_FACTORY,
                    "org.jboss.naming.remote.client.InitialContextFactory");
            properties.put(Context.PROVIDER_URL, "remote://localhost:4447");
            properties.put(Context.SECURITY_PRINCIPAL, USERNAME);
            properties.put(Context.SECURITY_CREDENTIALS, PASSWORD);
            InitialContext jndiContext = new InitialContext(properties);

            // lookup queue
            ConnectionFactory connectionFactory =
                (ConnectionFactory) jndiContext.lookup("jms/RemoteConnectionFactory");
            Queue testQueue = (Queue) jndiContext.lookup(queueName);

            queueConnection = connectionFactory.createConnection(USERNAME, PASSWORD);
            Session queueSession = queueConnection.createSession(false,
                    Session.AUTO_ACKNOWLEDGE);
            MessageProducer messageProducer = queueSession.createProducer(testQueue);
            TextMessage textMessage = queueSession.createTextMessage();

            textMessage.setText(message);
            messageProducer.send(textMessage);
            System.out.println("Message sent");

        } catch (NamingException nameEx) {
            System.out.println("Naming error: " + nameEx);
        } catch (javax.jms.JMSException jmsEx) {
            System.out.println("JMS Exception: " + jmsEx.toString());
        } finally {
            if (queueConnection != null) {
                try {
                    queueConnection.close();
                } catch (javax.jms.JMSException jmse) {
                    // ignore
                }
            }
        }
    }
}
To be able to run SimpleSend you have to add the Boss client jar before other jars in the classpath of the run configuration for SimpleSend. The client jar is located at JBOSS_HOME/bin/client/jboss-client.jar.
Run SimpleSend. You’ll find in JBoss console log something like this:
11:40:15,275 INFO  [org.jboss.as.naming] (Remoting "noname" task-3) JBAS011806: Channel end notification received, closing channel Channel ID 00b450da (inbound) of Remoting connection 7ed6616a to null
11:40:15,335 INFO  [stdout] (Thread-29 (HornetQ-client-global-threads-2030982183)) Hibernate: call next value for hibernate_sequence
11:40:15,377 INFO  [stdout] (Thread-29 (HornetQ-client-global-threads-2030982183)) Hibernate: insert into PLANET (CREATEDBY, CREATEDDATE, LASTUPDATED, LASTUPDATEDBY, MESSAGE, NAME, VERSION, ID) values (?, ?, ?, ?, ?, ?, ?, ?)
Open SoapUI again an execute the getAllPlanets request. Voilà! The planet is retrieved.
Source
The complete source code for this tutorial is available in GitHub: https://github.com/sculptor/sculptor/tree/master/sculptor-examples/ejb-example
